Wednesday, September 2, 2009

Incredible Bundt Cake

Sometime over the course of the last year or so I acquired a cookbook called 101 Things to Do With a Cake Mix. I pulled it out yesterday as I had just been to the grocery store and cake mixes were on sale (gotta love 10 for $10 items!). I decided to whip something up for the NICU nurses. I make brownies and cookies a lot, so I decided to go with a cake. I originally chose a chocolatey cake, but then I remembered something.

Last week I was telling Lily's primary nurse Julia about my plan to bring in cupcakes for the babies 2 month birthday and Julia informed me that "Lily" was not a fan of chocolate cake and preferred vanilla. As not to disappoint "Lily," I ditched the chocolate cake and went with this one instead. The problem with making a cake to give away is that you can't taste it beforehand. However, if the aroma it made while baking is any indication, this cake is awesome! I got many compliments on it from the nurses today, so I think it's a winner! While typing this recipe I realized that I forgot to divide the chips and nuts and instead put them all in one layer. I'm not sure if it made much of a difference, but next time I'll try to pay attention to the directions!

Incredible Bundt Cake

1 yellow cake mix
1 small box vanilla pudding
1 cup sour cream
3 large eggs
1/4 cup vegetable oil
1/4 cup applesauce
1 cup semisweet chocolate chips, divided
1 cup chopped pecans, divided

Preheat oven to 350 degrees. Using and electric mixer, blend the cake mix, pudding, sour cream, eggs, oil and applesauce 5-6 minutes. Grease and flour a bundt or tube pan. Pour 1/3 of the batter into pan and sprinkle one half of chocolate chips and nuts over it. Pour in remaining batter and top with remaining chips and nuts. Bake 50 to 55 minutes. Cool about 5 minutes, then turn out onto a serving plate; cool completely.


Chocolate Chocolate Chip Cookies

Charlie and Lily have been in the NICU for a little over 2 months now. In this time we've really gotten to know many of their nurses well, and they are wonderful, wonderful women. To show our gratitude to them in some small way, I try to bake them treats at least once a week. Sometimes it's just brownies from a box, but when I have time I try to do something from scratch. These cookies were one of the first treats I made for them after I got out of the hospital and they were delicious! Rich and fudgy and chewy - a huge hit! I left out the nuts in case anyone was allergic and I added a cup of semisweet chocolate chips in addition to the white chips.

(The recipe is linked above, but I will add it to the post later. For some reason Blogger is refusing to let me copy and paste...)

I'm back!


So by now everyone knows why I haven't been baking or cooking much since my last post! Joe and I have been spending a lot of time in the NICU with Charlie and Lily - we love being parents! I don't have much free time at home these days, but I'm trying to cook and bake a little when I can. So stay tuned for some new posts!

Saturday, May 16, 2009

On Hiatus

Well, I'm sorry to announce that "...and a cookie for dessert" will be taking a rather lengthy hiatus. I've been put on bedrest, most likely until the babies arrive, and then I think I'm going to have my hands full for awhile after that. I hope to be able to return at some point though, as I really do love this blog!! But thank you to everyone who's been reading all this time and hopefully, I'll be back!!

In the meantime, if you're curious to see what's going on with me in baby land, check out my baby blog - http://threecheersforbabies.blogspot.com/

Wednesday, May 6, 2009

Cake Batter Ice Cream

Now that the weather is finally getting warmer I decided it was time to break out my ice cream maker. I knew that Lauren had been using her ice cream maker all through the winter so she had an arsenal of great recipes for me to choose from. I bookmarked several, but decided to give this cake batter ice cream a whirl first since Joe is a big fan of cake batter ice cream. Like Lauren I used Funfetti cake mix, but heeding her warning about the sprinkles dissolving I added more sprinkles to my ice cream at the very end, just to make it more colorful. This ice cream is SO delicious! And the ice cream came out perfect - creamy and rich and the perfect consistency. In fact, I think it's the best ice cream I've ever made! I highly recommend this!

Cake Batter Ice Cream

1 cup whole milk, well chilled
3/4 cup granulated sugar
2 cups heavy cream, well chilled
1 teaspoon pure vanilla extract
2/3 cup Funfetti cake mix

In a medium bowl, whisk the milk and granulated sugar until the sugar is dissolved.

Stir in the heavy cream and vanilla.

Stir in cake mix, making sure there are no lumps.

Pour mixture into the freezer bowl of your ice cream maker and let mix until it has thickened (about 25-30 minutes).

Remove ice cream from freezer bowl and place into a separate container.

Place freezer bowl and the ice cream into the freezer to further harden.

Tuesday, May 5, 2009

Weeknight Paella

Another winner from my friend Colleen! Joe and I love paella. In fact, Joe loves basically any combination of proteins and rice. This paella uses shrimp and sausage and comes together with the help of some Mexican rice mix and peas. It's incredibly delicious and is perfect for a weeknight, just as Colleen described. I did not have any chorizo so I used turkey sausage and it was still fantastic! I look forward to having this again soon!

Weeknight Paella

2/3 cups yellow rice (Goya)
1 1/2 tablespoons olive oil
1 small shallot, chopped
1 clove garlic, minced
1/2 pound large shrimp, shelled and deveined
1/2 pound chorizo, sliced
1 cup plus 2 tablespoons chicken broth
1 tablespoons fresh parsley, chopped
1/3 cup frozen peas

Heat olive oil in large saute pan over medium-high heat. Add rice and cook until it begins to toast, about 1-2 minutes.

Add shallot and garlic and continue to saute until garlic is fragrant, about 1 minute.

Add shrimp, chorizo, and broth. Cover pan tightly and reduce heat to medium-low. Cook for 18 minutes.

Remove lid, add parsley and peas and cook until heated through. Continue cooking uncovered until all liquid is absorbed.

Monday, May 4, 2009

Famous "Ben-chiladas"

I've heard a lot about these enchiladas on the What's Cooking board - a creation of the awesome Annie. I was inspired to make it though when I saw it on Lauren's blog and she posted that her husband Pat liked them. I had been unsure but Joe and Pat often have similar tastes so hearing that Pat enjoyed it was a good sign. And it was - Joe LOVED this! He raved about it the entire time he was eating it. Plus it was super quick and simple to put together. I made it even simpler by using Perdue pre-cooked Southwestern chicken strips - all I had to do was take the chicken from the package and put it right into the tortillas. I will definitely make this again!

Annie's Ben-chiladas

1 package Perdue Southwestern pre-cooked chicken strips
8 oz. reduced fat sour cream
8 oz. Ranch salad dressing
flour tortillas
jar of salsa
shredded Mexican cheese

In a large mixing bowl, combine half of the sour cream and half of the Ranch dressing. In a small bowl, combine the rest of the sour cream and Ranch dressing. Stir both until well combined. Add the chicken to the large mixing bowl. Mix well with sauce.

Preheat the oven to 375°. Grease a 9 x 13″ pan (and possibly another, smaller pan if needed). Take one tortilla and top with a little less than 1 tbsp. of the sauce from the small bowl. Spread over the tortilla in an even layer. Add some of the chicken mixture to the center of the tortilla. Top with salsa to taste. Sprinkle with shredded cheese, to taste. Roll up tortilla and place, seam side down, in the prepared baking dish. Repeat with remaining ingredients (I only made 4 large enchiladas but you can make as many as you need by increasing the amount of ingredients.)

Bake in preheated oven for 25-30 minutes (30 for a crispier tortilla). Allow to cool a few minutes before serving.

Sunday, May 3, 2009

Lemon Pepper Shrimp Scampi

Another winner from the My Recipes Dinner Tonight emails that I received. John had offered to cook for us and I had a bag of shrimp in my freezer so I forwarded this recipe to him. It sounded quick and easy - and delicious - and it was! I love orzo and this dish was creamy and buttery and just plain good!

Lemon Pepper Shrimp Scampi

1 cup uncooked orzo
2 tablespoons chopped fresh parsley
1/2 teaspoon salt, divided
7 teaspoons unsalted butter, divided
1 1/2 pounds peeled and deveined jumbo shrimp
2 teaspoons bottled minced garlic
2 tablespoons fresh lemon juice
1/4 teaspoon black pepper

Cook orzo according to package directions, omitting salt and fat. Drain. Place orzo in a medium bowl. Stir in parsley and 1/4 teaspoon salt; cover and keep warm.

While orzo cooks, melt 1 tablespoon butter in a large nonstick skillet over medium-high heat. Sprinkle shrimp with remaining 1/4 teaspoon salt. Add half of shrimp to pan; sauté 2 minutes or until almost done. Transfer shrimp to a plate. Melt 1 teaspoon butter in pan. Add remaining shrimp to pan; sauté 2 minutes or until almost done. Transfer to plate.

Melt remaining 1 tablespoon butter in pan. Add garlic to pan; cook 30 seconds, stirring constantly. Stir in shrimp, juice, and pepper; cook 1 minute or until shrimp are done.

Friday, April 24, 2009

An Excuse - Times 3!

So I've been gone for quite some time now, and I apologize! But I have a good reason - in fact, I have three!! I am expecting triplets in late August! Joe and I are so, so excited and ready to be parents to our beautiful little babies. Needless to say, I've sort of been preoccupied with things other than my food blog. A combination of not having the energy or desire to cook, having had surgery I needed to recover from, and the development of an aversion to chicken breasts (what used to be our main protein) have led Joe and I to live off of takeout (hello, Wendy's) and meals prepared by my wonderful mother-in-law.

Of course, a perk of being pregnant with triplets is that you need to gain a lot of weight and eat a lot of calories daily. Therefore, I have become a close personal friend of Cold Stone Creamery, Carvel, the Chinese delivery guy... Or I should say Joe has become a close personal friend as he is the one who keeps me stocked with treats :)

I do have a few new recipes ready to blog and I hope to get to that soon. In the meantime, if anyone has super fast and easy recipes that are simple enough for a husband to prepare (and 0that don't involve whole chicken breasts) please send them my way! I also accept donations for my daily ice cream habit....

Monday, March 30, 2009

A new post! Tortellini Salad

Can you believe it? I have a new post! Well, kind of new. This is a modified version of this pasta salad, but it's so good I thought it was worth posting again!

I made this tortellini salad for our most recent girls get together with Lauren, Sarah and Colleen. (Jenn and Katie, you were missed!). We went with a brunch theme this time, so I thought this tortellini salad would fit right in. And it went great with Colleen's awesome chicken salad, Sarah's amazing salad and Lauren's decadent stuffed French toast. (See Lauren's blog post for all the yummy details of our goodies!) This salad is super easy to throw together (it really requires no real cooking - shhhhhh) and is perfect for the soon-to-be-arriving warmer weather!

Tortellini Salad

2 bags frozen tri-color tortellini
1 can sliced black olives
1/2 jar roasted red peppers, chopped
1/2 jar artichoke hearts, chopped
1 ball fresh mozzarella, cubed
2 cups bottled sun-dried tomato dressing

Cook tortellini according to package directions. Place in bowl and toss with 1 cup dressing. Allow to cool. Toss in all other ingredients and additional 1/2 cup of dressing. Refrigerate until ready to serve. Just before serving, toss with the final 1/2 cup dressing.

Wednesday, March 18, 2009

I'm still here!

I need to apologize to my poor neglected blog for the lack of updates. I've had some health issues recently that have prevented me from doing any cooking or baking. I'm hoping though that by next week I'm back on my feet and back in the kitchen. Stay tuned!

Monday, March 2, 2009

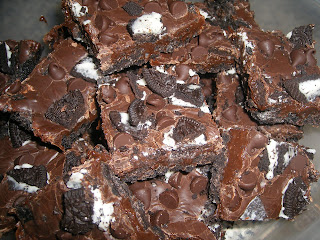
Oreo Fudge Bars

From the moment I saw these bars on Stephanie's blog I knew that I had to make them. They looked SO good. Last Friday John and Rebecca invited us over for dinner so I offered to make these bars for dessert. These are great because they are different. There's no cake to them at all, just Oreos and creamy chocolate. They are rich and delicious and very, very good. John and Rebecca made an awesome chicken chili (which I'll be making soon to post!) and we enjoyed these bars while we played Trivial Pursuit. For a quick and rich dessert, these are perfect!

Oreo Fudge Bars

1 16oz. package of Oreo cookies
1 stick butter, melted
1/4 tsp satl
1 (14 ounce) can sweetened condensed milk
1 teaspoon vanilla extract
3/4 cup semi-sweet chocolate chips
1/2 cup milk chocolate chips (I used another 1/2 cup semi-sweet)
1/2 cup mini chocolate chips (I used regular)

Preheat the oven to 325. Line a 9×13 pan with foil and lightly spray with cooking spray. Set aside 6 Oreo cookies for the toppings. In a small food processor grind the rest of the cookies. If you don’t have a food processor, just pound with a rolling pin until the cookies are fine crumbs. Add the salt to the crumbs and stir to combine. Melt butter and gently stir together with the cookie crumb mixutre. Press firmly into the bottom of the prepared pan. Coarsely chop the remaining cookies into chunks and set aside.Over a double boiler or in the microwave, melt 3/4 cup semi-sweet and 1/2 cup milk chocoalte chips together with the condensed milk and vanilla. Stir frequently until smooth. Spread evenly over the prepared cookie crust.


Sprinkle the mini chocolate chips and the Oreo cookies chunks over the top of the filling. Press down gently into the chocolate topping. Bake for 20-22 minutes oven. Allow to cool on counter for 1 hour. Chill in fridge until completely cold and set before cutting into bars.

A gift of baked ziti

Our next door neighbors recently brought home their new baby boy. I wanted to bring them something for the occassion and figured that food would be the most practical gift for the new parents. I decided to make them a pan of baked ziti for a quick and easy dinner, and I also whipped up some chocolate chip muffins. The muffins were from a mix, so no recipe, but this ziti was from scratch. I have tons of ziti recipes floating around, but I decided this time to just use the one on the back of the San Giorgio pasta box. I made one pan for my neighbors and kept one pan for Joe and I to enjoy. This ziti was really good. So gooey and creamy - I just love ricotta! Our neighbors were very happy with the food and I was happy to get to fuss over the cute little baby!

Baked Ziti

1 box ziti, uncooked
1 jar spaghetti sauce
1 3/4 cups ricotta cheese (15 oz)
2 cups shredded mozzarella cheese (8 oz)
1 Tbsp parsley
1 egg
1 Tsp oregano
1/2 Tsp garlic powder
1/2 Tsp salt
1/4 Tsp black pepper
3 Tbsp Parmesan cheese

Heat oven to 375°F. Cook pasta according to package directions for 9 minutes; drain. In large bowl, stir together hot pasta, 1-1/2 cups spaghetti sauce, ricotta cheese, mozzarella cheese, parsley, egg, oregano, garlic powder, salt and pepper. In 13×9 x 2-inch baking dish, spoon pasta mixture; top with remaining 1-1/2 cups sauce. Sprinkle with Parmesan cheese; cover with foil. Bake 30 minutes or until hot and bubbly.

Birthday Banana Cake

It's become a tradition for me to make my dad's birthday cake each year. Last year's German chocolate cake didn't go as smoothly as I would have liked, so I was relieved this year when he asked for something relatively simple - a banana cake. My mom requested that the cake also contain chocolate, so I hit my Google Reader in search of the perfect recipe. I found this one on Cate's blog and it looked perfect - simple and delicious.

This cake was very easy to make. My only issue came with the frosting. It was delicious (I mean, it starts with melted chocolate, how could it be bad?) but I found that it wasn't very spreadable. I got it on the cake, but it wound up getting kind of dry and sort of falling off the cake when it was cut. It did taste great though, so no one minded. Everyone enjoyed this cake - served with a scoop of fudge ripple ice cream it was the perfect birthday treat!


Banana Cake with Milk Chocolate Frosting

Cake:
1/2 cup butter, melted
3/4 cup sugar
1 tsp vanilla
3 ripe bananas
4 tbsp yogurt or sour cream
2 large eggs
1 tsp baking soda
1/2 tsp baking powder
2 cups flour
1 cup milk chocolate chips

Preheat oven to 350 F.
Grease a 13 x 9 baking dish.
Combine the butter, sugar and vanilla in a stand mixer and mix well.
Mash bananas and add to butter mixture.
Stir in yogurt and eggs, mixing well.
Whisk together the dry ingredients in a separate bowl, then add to the batter, stirring until blended.
Fold in chocolate chips.
Bake for about 25 minutes, or until a toothpick inserted in the center comes out clean.
Set pan on a wire rack to cool.

Frosting:
1 cup milk chocolate chips
1/4 cup butter
1 cup powdered sugar
2 tsp milk
Melt the chocolate chips in the microwave or the top of a double boiler and cool slightly.
Place butter and chocolate in the bowl of a stand mixer and beat for 2 minutes on medium-high speed.
Add powdered sugar and continue mixing.
Add the milk about 1/2 tsp at a time until the frosting is a spreadable consistency.

Sunday, February 22, 2009

Pinch Hitting: Buffalo Chicken Dip

When Joe first met our friend Doug, it was love at first sight. Aside from their mutual enjoyment of baseball, comic books and Wii, Joe was smitten with the Buffalo Chicken Dip that Doug made for our first get together with he and his wife Christina. Joe loved it so much, in fact, that poor Doug now has to make the dip every time he knows he's going to see Joe. We were supposed to get together with Doug and Christina for dinner and Wii on Saturday night, but poor Christina got sick and had to cancel. Upon hearing that our plans were cancelled, Joe (after inquiring about Christina's health, of course...) promptly cried, "No dip?!?!" Followed by "Well, Doug's not sick. He could come over here!" In order to ease the pain of Joe's Doug-less night, I offered to make buffalo chicken dip for him myself. I hit Google and searched for a recipe that sounded about right, and settled on this one from Frank's RedHot. This dip is super easy to put together and is spicy and creamy - pure heaven, in Joe's opinion. He assured me that it was just as good as Doug's dip, but he may have been just sparing my feelings. Feel better Christina - Joe misses your husband! :)

Buffalo Chicken Dip

8 oz. pkg. cream cheese, softened
1/2 cup blue cheese or ranch salad dressing
1/2 cup any flavor hot sauce
1/2 cup crumbled blue cheese or shredded mozzarella cheese
2 cans (9.75 oz. each) Premium Chunk Chicken Breast in Water, drained

Heat oven to 350°F. Place cream cheese into deep baking dish. Stir until smooth. Mix in salad dressing, hot sauce and cheese. Stir in chicken. Bake 20 min. or until mixture is heated through; stir. Garnish as desired. Serve with crackers or vegetables.

Microwave Directions: Prepare as above. Place in microwave-safe dish. Microwave, uncovered, on HIGH 5 min. until hot, stirring halfway through cooking.

Slow Cooker Method: Combine ingredients as directed above. Place mixture into small slow cooker. Cover pot. Heat on HIGH setting for 1 1/2 hours until hot and bubbly or on LOW setting for 2 1/2 to 3 hours. Stir.

Wednesday, February 18, 2009

Happy Birthday Anne! (and piggy cookies!)

My mother-in-law's birthday is today, and what's a birthday without a cake? I asked her what type she'd like and she just said "something chocolate." Easy enough! I had a bunch of leftover Halloween candy still in my pantry so I decided to utilize that as well. Peanut butter cups...mmmm. To avoid chocolate overload (as if there was such a thing - ha!) I decided to fill the cake layers with our favorite peanut butter frosting. Seriously, this stuff is beyond amazing! I made the cake from a box (I've had some bad luck with cakes from scratch) and stuffed the layers with the peanut butter frosting and chopped up peanut butter cups.

I spread some triple chocolate frosting (courtesy of Betty Crocker) on the top and added more peanut butter cups. The result? Rich, peanut buttery and delicious!

Happy birthday, Anne!

On another note, Joe came home from school yesterday with some cookies that some of his students had made in their home ec class. Aren't they the cutest things?!?

Birthday Mac and Cheese

My mother-in-law Anne's birthday is today so on Monday evening we had the family over to celebrate. I made thyme-coated pork loin and a salad, my brother-in-law John's girlfriend Rebecca made corn muffins and John and Rebecca made Classic Macaroni and Cheese from Cook's Illustrated. They had made this recipe before and raved about it, so I asked them to recreate it for dinner.

John and Rebecca adding the cheese....mmmm.

This macaroni and cheese was fantastic! It was gooey and creamy with just the right amount of flavor. A definite hit!

Classic Macaroni and Cheese

Bread Crumb Topping:
6 slices white sandwich bread (good-quality, about 6 ounces), torn into rough pieces
3 tablespoons unsalted butter (cold), cut into 6 pieces

Pasta and Cheese:
1 pound elbow macaroni
1 tablespoon salt
5 tablespoons unsalted butter
6 tablespoons flour
1 1/2 teaspoons powdered mustard
1/4 teaspoon cayenne pepper (optional)
5 cups milk
8 ounces Monterey Jack cheese , shredded (2 cups)
8 ounces sharp cheddar cheese , shredded (2 cups)
1 teaspoon salt

For the bread crumbs: Pulse bread and butter in food processor until crumbs are no larger than 1/8 inch, ten to fifteen 1-second pulses. Set aside.

For the pasta and cheese: Adjust oven rack to lower-middle position and heat broiler. Bring 4 quarts water to boil in Dutch oven over high heat. Add macaroni and 1 tablespoon salt; cook until pasta is tender. Drain pasta and set aside in colander.

In now-empty Dutch oven, heat butter over medium-high heat until foaming. Add flour, mustard, and cayenne (if using) and whisk well to combine. Continue whisking until mixture becomes fragrant and deepens in color, about 1 minute. Gradually whisk in milk; bring mixture to boil, whisking constantly (mixture must reach full boil to fully thicken). Reduce heat to medium and simmer, whisking occasionally, until thickened to consistency of heavy cream, about 5 minutes. Off heat, whisk in cheeses and 1 teaspoon salt until cheeses are fully melted. Add pasta and cook over medium-low heat, stirring constantly, until mixture is steaming and heated through, about 6 minutes.

Transfer mixture to broiler-safe 9-by 13-inch baking dish and sprinkle evenly with bread crumbs. Broil until crumbs are deep golden brown, 3 to 5 minutes, rotating pan if necessary for even browning. Cool about 5 minutes, then serve.

Tuesday, February 10, 2009

"Freaking Good" Texas Chicken Quesadillas

A few weeks ago when my friends and I got together for Mexican themed lunch, Jenn made these awesome quesadillas. I'm not a big fan of traditional Mexican food, so in my book these were perfect. I ate way more than my fair share of them during lunch and immediately put them on my menu for dinner this week. Were they a good as I remember? Hell yes! These things are amazing. I think it's the caramelized onion/honey mixture that really makes them - so tangy and sweet. Joe and I were drooling over these while the chicken was still browning in the pan, and all that anticipation was well deserved. These rock - plain and simple. Between just about every bite Joe announced, "These are freaking good!" And they are. I followed the recipe exactly and baked them in the oven since I don't have a quesadilla maker. But these make me want to buy one. Seriously. But for now, I'll just settle for making them again very, very soon!

Texas Chicken Quesadillas

2 TBSP of oil
1-1/2 onions (vidalia is preferred) sliced into rings
1 TBSP honey
2 chicken breasts, diced
1/2 cup BBQ sauce
1 Cup shredded Mexican cheese
8 ten inch flour tortillas

Heat one tablespoon of the oil in a pan over medium high heat. Add the onions and cook until they begin to caramelize. Mix in the honey and stir until it is golden brown. Remove and set aside.Place the remaining oil in the pan and add the chicken. Cook through over a medium high heat. Stir in the BBQ sauce to evenly coat the chicken.Place the chicken, onions and cheese onto a tortilla, top with the other tortilla and cook in your quesadilla maker about 5 minutes. Alternatively, you can cook them in the oven at 350 degrees for 20 minutes.

Seriously...LOOK at that filling!!! Mmmmm.....

Creamy Cajun Shrimp Linguine

Last week frozen shrimp was on sale at the grocery store so I snagged a bag. My favorite way to enjoy shrimp is with pasta, and I'm always looking for new recipes to try. I saw this one on my friend Colleen's blog and thought it looked perfect. Not only was this pasta delicious but it was very easy to make. I followed Colleen's modifications - I used fat free half and half and roasted red peppers, plus I chose turkey bacon instead of regular. I left out the mushrooms because Joe doesn't like them and I wasn't really in the mood for them.

I found that I really didn't have much sauce after I'd followed the recipe, so I added about another 1/4 cup of half and half and an extra shake of Cajun seasoning. I still would have liked it a little saucier, but it was delicious nonetheless. And Joe preferred it the way it was so it ended up working out just fine. This pasta is creamy and delicious, with just the right amount of kick. I hope shrimp is on sale again soon!

Creamy Cajun Shrimp Linguine

8 ounces uncooked linguine
1 pound large shrimp, peeled and deveined
about 6 slices bacon or turkey bacon, cooked and chopped
1 1/2 tablespoons butter
1 (8 ounce) package presliced mushrooms (I omitted)
7 ounce jar roasted red peppers, drained and sliced or 1 large red pepper, chopped
2 teaspoons all-purpose flour
1 teaspoon Cajun seasoning
1/4 teaspoon salt
2/3 cup half-and-half
1/4 cup chopped fresh parsley

Bring medium pot of water to boil. Add linguine and cook 5 minutes. Add shrimp to pot and cook 3 more minutes. Drain and keep warm.Melt butter in large skillet. Add roasted red peppers and mushrooms; saute 4 minutes or until moisture evaporates. Add flour, seasoning, and salt to pan; saute 30 seconds. Stir in half-and-half; cook one minute or more until sauce thickens, stirring constantly. Remove from heat. Add pasta mixture, bacon, and parsley to pan; stirring to combine.

Saturday, February 7, 2009

Chicken Enchiliada Soup

I've really been enjoying making soup for dinner recently, so I was excited to find this recipe on Deborah's blog. And I was extra excited to see that it used the crock pot - I do love my crock pot! I lessened my work even more by buying a package of Perdue southwestern pre-cooked chicken strips, so all I had to do when I got home from work was toss the chicken into the soup to heat up - no stove top cooking at all! I left out the 2 cups of cheese that the original recipe called for because without it this is a pretty healthy soup! I sprinkled a little cheese on top and it was perfect. (And okay I MAY have served this with cheese quesadillas, but at least the soup is low fat...) I loved this soup! It is incredibly flavorful and hearty and just plain good. I'm looking forward to having the leftovers for lunch today!

Chicken Enchilada Soup

1 15-ounce can black beans, rinsed and drained
1 14.5-ounce can diced tomatoes, drained
1 10-ounce package frozen whole kernel corn
1/2 cup chopped onion
1/2 cup chopped yellow, green, or red bell pepper
1 10-ounce can enchilada sauce
1 10.75-ounce can condensed cream of chicken soup
2 cups milk (I used skim)
1 cup shredded Pepperjack cheese (4 ounces)
4 chicken breasts

In a 3 1/2 to 5 quart slow cooker, combine drained beans, drained tomatoes, corn, onion, and bell pepper. In a large bowl, whisk together enchilada sauce and soup. Gradually whisk in milk until smooth. Pour sauce mixture over ingredients in cooker.Cover; cook on low heat for 6 to 8 hours or on high for 3 to 4 hours. Cut chicken into bite sized cubes. Cook over medium heat until cooked all the way through. Add into soup. Can be topped with avocado, sour cream, or crushed tortilla chips. Sprinkle a little cheese on top before serving.

Crispy Chicken Strips

This week John's coworker made him a humongous pan of her delicious macaroni and cheese and John was kind enough to share some of it with Joe and I. I wanted to use the mac and cheese as a side dish, so I needed a chicken recipe that would be a good accompaniment. Everyone knows that fried chicken goes well with mac and cheese, but I just do not like fried chicken, plus I have never fried anything in my life - all that oil? No way! So I searched some of my favorite food blogs and found this recipe of Stephanie's for crispy chicken strips. I made just a few changes - I used regular breadcrumbs in place of panko, egg beaters in place of eggs and Dijon mustard in place of honey, as Joe does not like his dinner foods sweet.

These chicken strips were great! Nice and juicy with a delicious crispy crust. I dipped mine in ketchup ;) They were a great match for the gooey mac and cheese and will definitely be making an appearance in my kitchen again! Now I just need more of that mac and cheese! John........?

Crispy Chicken Strips

1 pound boneless skinless chicken breasts, cut into strips
1 cup all-purpose flour
2 teaspoons onion powder
2 teaspoons paprika
1 cup Egg Beaters
2 tablespoons Dijon mustard
8 ounces Italian seasoned breadcrumbs

Preheat oven to 400 degrees. Cover a baking pan with aluminum foil to make clean-up quick and easy.Combine flour, onion powder and paprika in a shallow dish. In a second shallow dish, beat 2 eggs, then add honey and stir to combine. In a third shallow dish, add the panko bread crumbs and Italian seasoning, if using it). Dip the chicken strips first, in the flour mixture, then the eggs and finally in the panko bread crumbs. Make sure to press the crumbs into the chicken in order to ensure they adhere to the chicken.Please all chicken strips on prepared baking pan, then spray each strip with cooking spray. Bake for about 20 minutes or until done.

Sunday, February 1, 2009

Mexican Chocolate Crunch Brownies

Last December I got together with my wonderful friends Lauren, Sarah, Jenn and Colleen for a potluck lunch. We had so much fun that we decided to do it again this past Saturday. We chose Mexican for our lunch theme and I was put in charge of dessert. I have to admit I was at a bit of a loss, as there aren't a ton of Mexican desserts to choose from. I didn't want anything too heavy, as Mexican food is so heavy, and I also didn't want anything super complicated. I remembered that Anna of Cookie Madness had posted several Mexican cookies and brownies on her blog, so I ran over there for inspiration. It was there that I found this recipe for Mexican Chocolate Crunch Brownies.

They sounded yummy, plus I had all the ingredients on hand except for the cereal, so they were also convenient. These came together in no time and have a wonderful chocolate/cinnamon aroma. I have to admit, I wasn't sure what I thought of these at first. The crunchy cereal base kind of threw me off, but the more I tasted, the more they grew on me. The girls seemed to like them a bit more than I did, so they couldn't have been too bad. I loved the addition of cinnamon to the brownie batter and the cinnamon sugar topping. They were a nice ending to our wonderful Mexican feast!

As for that feast, we started off with awesome barbecue chicken quesadillas made by Jenn and delicious dip and guacamole from Colleen. For our main course, Lauren made us a Mexican taco bake and Sarah made Mexican rice. Everything was delicious! (I believe Sarah is going to post all the food from our lunch, so check out her blog for all the mouth-watering pics!) Thanks to Jenn for hosting and I can't wait to do it again!

Mexican Chocolate Crunch Brownies

1box (12.8 oz) Cinnamon Toast Crunch® cereal (about 8 cups)
1/2 cup butter, melted
1 tablespoon corn syrup
1 box (19.5 oz) fudge brownie mix
1/2 cup vegetable oil
1/4 cup water
2 eggs
1/2 teaspoon ground cinnamon
1 1/3 cups semisweet chocolate chips
3 tablespoons cinnamon-sugar (from 3.62-oz jar)*

Heat oven to 350°F. Spray 13x9-inch pan with cooking spray. Place cereal in food processor bowl with metal blade (crush cereal in 2 batches if necessary). Cover; process until finely crushed (about 4 cups). Or place cereal in large resealable food-storage plastic bag; crush with rolling pin. (I did it in a bowl with a potato masher!) In large bowl, stir butter and corn syrup until well blended. Add crushed cereal; mix thoroughly. Press evenly in pan.


In large bowl, make brownie mix as directed on box, using oil, water and eggs and adding cinnamon. Stir in 2/3 cup of the chocolate chips. Pour brownie batter over cereal mixture. Sprinkle remaining 2/3 cup chocolate chips evenly over batter.
Bake 20 minutes. Sprinkle cinnamon-sugar evenly over brownies. Bake 14 to 18 minutes longer or until brownies are set when lightly touched in center. Cool 10 minutes; loosen edges but do not cut. Cool completely, about 2 hours. For brownies, cut into 6 rows by 4 rows.

*Three tablespoons sugar mixed with 1/2 teaspoon ground cinnamon can be substituted for the cinnamon sugar.


Thursday, January 29, 2009

Hamburger Noodle Casserole

Tonight's dinner was another yummy recipe from the Taste of Home Comfort Food Diet magazine. This lightened hamburger noodle casserole is sort of a homemade hamburger helper, but much tastier! The addition of ricotta, sour cream and cream cheese make it nice and gooey and the egg noodles keep it from being too much like a baked ziti. I made a few changes to the recipe - I used only 4 ounces of cream cheese but a cup and half of ricotta (I used fat free), omitted the onion, used whole wheat egg noodles and used shredded mozzarella in place of the cheddar. This was a nice, simple comforting recipe - and it makes a ton so you can enjoy the leftovers another a night!

Hamburger Noodle Casserole

5 cups uncooked egg noodles
1-1/2 pounds lean ground beef
2 garlic cloves, minced
3 cans (8 ounces each) tomato sauce
1/2 teaspoon sugar
1/2 teaspoon salt
1/8 teaspoon pepper
1 package (8 ounces) reduced-fat cream cheese
1 cup reduced-fat ricotta cheese
1/4 cup reduced-fat sour cream
3 green onions, thinly sliced, divided
2/3 cup shredded reduced-fat cheddar cheese

Cook noodles according to package directions. Meanwhile, in a large nonstick skillet over medium heat, cook beef and garlic until meat is no longer pink; drain. Stir in the tomato sauce, sugar, salt and pepper; heat through. Drain noodles; stir into beef mixture. In a small bowl, beat the cream cheese, ricotta cheese and sour cream until blended. Stir in half of the onions. Spoon half of the noodle mixture into a 13-in. x 9-in. baking dish coated with cooking spray. Top with cheese mixture and remaining noodle mixture. Cover and bake at 350° for 30 minutes. Uncover; sprinkle with cheddar cheese. Bake 5-10 minutes longer or until heated through and cheese is melted. Sprinkle with remaining onions.

Wednesday, January 28, 2009

My Favorite Chocolate Chip Cookie

Today was a snow day for Joe and I, and what better to do on a day like this than bake cookies? These Best, Big, Fat, Chewy Chocolate Chip Cookies definitely get a lot of face time on cooking blogs. Some people adore them and some find them overrated. I fall into the former category - I LOVE these cookies. They are by far my favorite chocolate chip cookie recipe. They come out just the way I like them - big and sturdy, soft in the middle and crisp on the edges. And loaded with chocolate! Two tips for making these cookies turn out fantastic - chill the dough for at least 2 hours in the fridge before baking and let the cookies cool completely on the cookie sheets. I think it's a combination of these two things that makes the cookies nice and chewy. Oh okay, and a third tip - make them big! They definitely lose something if you try to portion them smaller. I used my 1/4 cup ice cream scoop and recommend something similar! Definitely give these a try - even if they don't turn out to be your new favorites, you'll still have some kick-ass cookies!

Best, Big, Fat, Chewy Chocolate Chip Cookies

2 cups all-purpose flour
1/2 teaspoon baking soda
1/2 teaspoon salt
3/4 cup unsalted butter, melted
1 cup packed brown sugar
1/2 cup white sugar
1 tablespoon vanilla extract
1 egg
1 egg yolk
2 cups semisweet chocolate chips

Preheat the oven to 325 degrees F (165 degrees C). Grease cookie sheets or line with parchment paper. Sift together the flour, baking soda and salt; set aside. In a medium bowl, cream together the melted butter, brown sugar and white sugar until well blended. Beat in the vanilla, egg, and egg yolk until light and creamy. Mix in the sifted ingredients until just blended. Stir in the chocolate chips by hand using a wooden spoon. Cover dough and chill for 2 hours.
Drop cookie dough 1/4 cup at a time onto the prepared cookie sheets. Cookies should be about 3 inches apart. Bake for 15 to 17 minutes in the preheated oven, or until the edges are lightly toasted. Cool completely on baking sheet.


Spicy Pork Sandwiches

My experiments with pork continue! This sandwich marks my first attempt at using ground pork. I spotted this recipe on kmay's blog and thought it looked like a nice throwback to summertime. What were supposed to be po'-boys morphed into plain old sandwiches when a yucky snow storm kept me from wanting to go to the store and get a baguette and lettuce. Instead I grilled these babies up and put "naked" the on wheat hamburger rolls. And they were delicious! The variety of seasonings make them nice and spicy, but the heat is nicely balanced by the mayo/mustard spread. I'll definitely make these again when the weather gets warmer - I know they'll be even better on the grill as opposed to on the stove top.

Spicy Pork Po-Boys

1 1/2 pounds ground pork
1 1/2 teaspoons paprika
1 1/4 teaspoons dried thyme
3/4 teaspoon cayenne pepper
3/4 teaspoon garlic powder
Kosher salt and freshly ground black pepper
1/2 cup mayonnaise
1 1/2 tablespoons Dijon mustard
2 medium kosher dill pickles, very finely chopped
1/2 small shallot, minced
Four 8-inch soft baguettes, split
2 cups shredded iceberg lettuce (I used green leaf lettuce.)
2 tomatoes, thinly sliced
Hot sauce, for serving

Preheat a grill pan. In a large bowl, using your hands, mix the ground pork with the paprika, thyme, cayenne pepper, garlic powder, 1 1/2 teaspoons of kosher salt and 1/4 teaspoon of black pepper. Form the pork into twelve 1/2-inch-thick patties. Grill the pork patties over moderate heat, turning once, until they are cooked through, about 8 minutes total.
Meanwhile, mix the mayonnaise with the Dijon mustard, pickles and shallot and season with salt and pepper. Spread the mayonnaise on both sides of the baguettes.
Place 3 pork patties on the bottom of each baguette and top with the lettuce, tomato and a few splashes of hot sauce. Close the sandwiches and serve.


Sunday, January 25, 2009

Lentil Sausage Soup

Joe and I eat lentils once a year - on New Year's Eve. Joe's grandmother Lucy believes that eating lentils at midnight on New Year's Eve will bring one luck and prosperity in the coming year. Each New Year's Eve Joe and I buy a can of lentil soup (Lucy used to make her own before her arthritis got the better of her) and dutifully eat a spoonful (and feed some to Roy, Roger and Tucker too) when the clock strikes 12 on January 1st. Each year we take our bite of lentil soup and say, "Mmmm, that's not bad. I'd eat that." But then we never do.

So when I spotted this recipe for sausage and lentil soup on Tara's blog I thought it was the perfect opportunity to try lentils on another occasion. And I'm glad I did - this soup is fantastic! I halved the recipe (the full version appears below) because it seemed like it would make a lot of soup. That was the right decision - Joe and I each had a nice big bowl and there are still a lot of leftovers! The only other changes I made was to sub spinach for the leeks (I stirred in a few cups of spinach right before I added the kielbasa) and to use turkey kielbasa for a little less fat and calories.

I was definitely happy with the way this turned out. It was the perfect cold Sunday evening supper. I wonder if eating lentils after New Year's Eve is also good luck? I hope so, because I could use some this week! :)

Lentil Sausage Soup

1 pound French green lentils (recommended: du Puy)
1/4 cup olive oil, plus extra for serving
4 cups diced yellow onions (3 large)
4 cups chopped leeks, white and light green parts only (2 leeks)
1 tablespoon minced garlic (2 large cloves)
1 tablespoon kosher salt
1 1/2 teaspoons freshly ground black pepper
1 tablespoon minced fresh thyme leaves
1 teaspoon ground cumin
3 cups medium diced celery (8 stalks)
3 cups medium diced carrots (4 to 6 carrots)
3 quarts chicken stock or broth
1/4 cup tomato paste
1 pound kielbasa, cut in 1/2 lengthwise and sliced 1/3-inch thick
2 tablespoons dry red wine or red wine vinegar
Freshly grated Parmesan, for serving


In a large bowl, cover the lentils with boiling water and allow to sit for 15 minutes. Drain.
In a large stockpot over medium heat, heat the olive oil and saute the onions, leeks, garlic, salt, pepper, thyme, and cumin for 20 minutes, or until the vegetables are translucent and tender. Add the celery and carrots and saute for another 10 minutes. Add the chicken stock, tomato paste, and drained lentils, cover, and bring to a boil. Reduce the heat and simmer uncovered for 1 hour, or until the lentils are cooked through and tender. Check the seasonings. Add the kielbasa and red wine and simmer until the kielbasa is hot. Serve drizzled with olive oil and sprinkled with grated Parmesan.

Monday, January 19, 2009

Must Make Chicken

You need to make this chicken. Now. Right now. What are you waiting for? Seriously - go make this chicken! I loooooved this dish (in case you couldn't tell)! I've had this recipe in my files for a long time and for some reason I had never made it. In fact, I don't even know where I got it, but I did track it down on Recipezaar. I selected it sort of spur of the moment last night and am so glad I did! The flavor of this is wonderful and the melty cheese and crunchy stuffing topping are a great contrast. I added about a cup of sliced mushrooms and and 2 cups of spinach to the sauce before pouring it over the chicken and I really liked this edition, plus it added some nutrients. I will most definitely be making this again - I was practically licking my plate!

Swiss Chicken

4 boneless skinless chicken breasts
4 slices Swiss cheese
1 (10 3/4 ounce) can cream of chicken soup
1/4 cup dry white wine
1 cup herb seasoned stuffing mix
1/4 cup butter, melted (I used cooking spray)

Arrange chicken in a lightly greased 13x9 inch baking dish. Top chicken with Swiss cheese. Combine soup and wine and stir until well mixed and spoon soup mixture evenly over chicken. Sprinkle with crumbled stuffing mix and drizzle melted butter over crumbs. Bake at 325° for one hour.

Honey Yeast Rolls

It's been way too long since I posted some bread, so here you go! I love, love, love making fresh bread and rolls, and mixing the dough in the bread machine makes it so much simpler. I did that with the dough for these amazing honey yeast rolls - I put all the ingredients (through the flour) in the bread machine on the dough cycle, then picked up the recipe in the third paragraph when my dough was done. So easy and so awesome! These rolls, courtesy of Amber, are delicious! Slightly sweet and soft and yeasty - yum! I followed Amber's suggestion and baked the rolls in a 9 x 13" baking dish and I recommend you do the same - I can't imagine all these big fluffy rolls fitting in a 9-inch pan. Joe and I gobbled up more than our share of these babies and are looking forward to polishing the rest off tomorrow!

Honey Yeast Rolls

2 1/4 teaspoon instant yeast
1 cup warm water (105°-115° F)
1/4 cup honey
3 tablespoon canola oil
1 1/2 teaspoon salt
1 egg, lightly beaten
4 cups bread flour, separated
vegetable cooking spray
1 tablespoon butter, melted
1 tablespoon honey

In the bowl of an electric mixer fitted with the paddle attachment, combine the yeast and warm water. Add the honey, oil, salt, and egg and mix well. Add 3 cups of the flour and mix until the dough comes together in a sticky mass. With the mixer on low speed, add the remaining 1 cup flour and mix until it is incorporated into the dough. Switch to the dough hook, and continue kneading on low speed until the dough is smooth and elastic, about 8 minutes.

Form the dough into a ball and transfer to a lightly oiled bowl, turning once to coat. Cover the bowl with a damp kitchen towel and let the dough rise in a warm, draft-free spot until it doubles in bulk, about 2 hours.*

Turn the dough out onto a lightly floured surface and knead for 30 seconds. Cover and let rest for 10 minutes.Punch the dough down and divide into 12 equal portions. Shape each portion into a ball and place into a round, lightly greased baking dish, spacing evenly. Cover and let rise in a warm, draft-free place for 20 minutes. Mix together the melted butter and honey, and brush lightly over the tops of the rolls. Bake at 400° for 13-15 minutes or until lightly browned. Serve warm or at room temperature.

*To utilize your bread machine, put all ingredients (through flour) into the machine in the order recommended by the manufacturer and select the dough cycle. Once dough is done, proceed with paragraph 3 of the recipe.

Sunday, January 18, 2009

Parmesan Potato Balls

I've mentioned before that my side dishes are often lacking in the creativity department. Rice, roasted potatoes, cheesy pasta - that's pretty much my repertoire. So when I spotted this recipe for Parmesan potato balls in the Taste of Home Comfort Food Diet magazine (a really great purchase, by the way!) I knew I had to give them a try. I'm going to link to the original recipe here, but I made a lot of changes so I'm posting my modified version below. First off, I'm lazy when it comes to mashed potatoes. DH and I are both perfectly content with instant mashed potatoes so I just can't be bothered going through the process of boiling and mashing potatoes. Plus, while I had cornflakes in my pantry for the crust, I didn't feel like crushing them up (hey, it was Friday night, what can I say?) so I used breadcrumbs instead.

These potato balls were really good! They had a nice crunchy exterior with a warm, creamy interior - very comforting. Plus, they had great flavor from the onion soup mix and hot sauce. Joe and I both liked these and I'll definitely be adding them to my side dish rotation!

Parmesan Potato Balls

3 cups prepared mashed potatoes
2 ounces cream cheese, softened
1/4 cup grated Parmesan cheese
2 1/2 teaspoons onion soup mix
1/2 teaspoon salt
1/8 teaspoon hot pepper sauce
1 dash pepper
1 egg, beaten
1 1/2 cups breadcrumbs

In a large mixing bowl, mix the cream cheese into the potatoes until smooth. Stir in Parmesan cheese, soup mix, salt, hot pepper sauce and pepper. Shape into 1 1/2 inch balls. Place the egg and breadcrumbs in separate shallow bowls. Dip potato balls in egg, then roll in crumbs. Place on ungreased baking sheets. Bake at 400 for 15-18 minutes or until crisp and golden brown.