Monday, June 30, 2008

Mega Turkey Nachos

I took this week off from work to just relax. I have plenty of vacation time and no actual vacation planned, so I thought it would be nice to have a week to just hang around the house, read, watch TV, etc. But I also thought I'd use some of my free time to try some new recipes. Since I am technically on vacation, and Joe is too since he's a teacher, I wanted to make some "fun" dinners this week. Luckily, the Rachael Ray newsletter landed in my inbox last week and I started browsing her recipes. I found many that I wanted to try that fell into the fun category and these Mega Turkey Nachos made it to tonight's menu. These were simple to make and very good. Both Joe and I really enjoyed them. I linked to the original recipe above, but I made several changes so my version is below. This dinner was a nice start to my week off!

Mega Turkey Nachos

cooking spray
1 pound extra lean ground turkey breast
1 tablespoon chili powder
1/2 tablespoon ground cumin
1 cup chopped green pepper
1 tablespoon minced garlic
Red pepper
1 box frozen corn kernels (10 ounces)
1 can black beans (15 ounces), rinsed and drained
1/2 cup chicken broth
Juice and zest of 1 lime
baked tortilla chips
1 1/2 cups shredded pepper Jack or sharp cheddar cheese, shredded
salsa
sour cream

Pre-heat the oven 375ºF.Place a large skillet over medium-high heat and coat with cooking spray. Brown and crumble the ground turkey for 3-4 minutes and season with chili powder and cumin. Add green pepper and season with red pepper. Cook for 8-10 minutes, stir in corn and beans, then heat through and adjust seasoning. Stir in chicken broth and cook for 1-2 minutes more, remove from heat, then stir in lime zest and juice of the lime. Arrange a layer of chips on a baking sheet with edges, top with half of the turkey mixture and half of the cheese. Repeat once, ending with the cheese. Transfer to the oven and bake until the cheese is melted, 5-6 minutes. Top with salsa and sour cream and serve.

Sunday, June 29, 2008

Taking a dip

This month Joe's grandfather turned 90 years old. To celebrate, the family through a huge party with all his friends and family. It was a great day. My contribution to the party was two appetizers, one being this spinach dip. I love this dip. Love it. It's so simple to make but tastes great. Plus I love that it's served in a bread bowl with bread for dipping. I love me some bread. This dip is always gobbled up right away, and this time was no exception. The recipe is below, but first let me say happy birthday, Freddie! I wish you 90 more wonderful years!

Spinach Dip

1 (16 ounce) container sour cream
1/2 cup mayonnaise
1 packet vegetable soup mix
1 box frozen chopped spinach, thawed

In a bowl, stir together the sour cream, mayo and soup mix. Squeeze spinach to eliminate excess water and add to sour cream mixture. Stir to combine. Refrigerate for at least 2 hours. Best served in a bread bowl with chunks of fresh bread for dipping!

Pinwheel, Pinwheel

Does anyone else remember that old kids' show from the 80's? Every time I think of this appetizer the Pinwheel theme song runs through my head - Pinwheel, pinwheel spinning around, look at my pinwheel and see what I've found...
Anyhow, this is the first time I've made these tortilla pinwheels, but it won't be the last. This is seriously the easiest appetizer ever. You can pretty much put any filling you choose in the tortillas - I went with roast beef, turkey and cheddar cheese. These were gone in a matter of minutes so they must have been good! As my brother-in-law said, they taste just like mini sandwiches.

Tortilla Pinwheels

5 large flour tortillas
1 container garlic and chive cream cheese
roast beef
turkey
shredded cheddar cheese

Spread tortillas with cream cheese and sprinkle with shredded cheddar. Top cheese with meat and roll tortilla tightly. Refrigerate a few hours or overnight. Slice rolls and serve.

Sunday, June 22, 2008

Emergency Room Cedar Plank Salmon

A few weeks ago at a cookout Joe and I had cedar plank grilled salmon for the first time - wow is it good. So we naturally wanted to make it ourselves. We went to Bed Bath & Beyond and purchased a pack of cedar planks and also picked up a grill basket for potatoes and veggies and at the farmer's market we bought some nice fresh salmon. I found this recipe on the Food Network website and we were super excited to make our own cedar plank salmon.

I'm happy to say that the salmon was absolutely wonderful. What wasn't wonderful was the trip to the emergency room we ended up taking after dinner. Technically it wasn't the salmon that did poor Joe in but rather the handle of the grill basket. He grabbed the handle with a pot holder, however the pot holder wasn't covering his entire hand and he burned a nice segment of his palm. We debated on whether or not to go the ER long enough to enjoy our dinner, and then did ultimately decide to take the trip. Joe had a second degree burn but was treated relatively quickly and was thankfully pain-free the next day. We will always remember this meal, and we will definitely make it again. But I'm buying bigger pot holders first.

Cedar Plank Salmon

1 cedar plank (6 by 14 inches)
2 salmon fillets (1 1/2 pounds total)
Salt and freshly ground black pepper
6 tablespoons Dijon mustard
6 tablespoons brown sugar

Soak cedar plank in salted water for 2 hours, then drain. Remove skin from salmon fillet. Remove any remaining bones. Rinse the salmon under cold running water and pat dry with paper towels. Generously season the salmon with salt and pepper on both sides. Lay the salmon (on what was skin-side down) on the cedar plank and carefully spread the mustard over the top and sides. Place the brown sugar in a bowl and crumble between your fingers, then sprinkle over the mustard.
Set grill for indirect grilling and heat to medium-high. Place the cedar plank in the center of the hot grate, away from the heat. Cover the grill and cook until cooked through, around 20 to 30 minutes. The internal temperature should read 135 degrees F. Transfer the salmon and plank to a platter and serve right off the plank.

Saturday, June 21, 2008

Cookie Carnival: Snickerdoodles

I was both disappointed and excited to learn that snickerdoodles were the first cookie I'd be making for the Cookie Carnival blogging event. Disappointed because I've made snickerdoodles many times in the past and was hoping for a chance to try something new, and excited because the only time I ever really make snickerdoodles is Christmas, so it gave me a chance to make these yummy cookies even though it's summer. I followed the recipe exactly because I didn't have much time to experiment and they came out great. Nice and chewy with the perfect mix of sugar and spice from the cinnamon. I bagged them up and plan to sell them at a fundraiser my pet rescue group is holding tomorrow. And I can't wait to continue to try new recipes through Cookie Carnival!
Snickerdoodles
2 3/4 cups all-purpose flour
2 teaspoons cream of tartar
1 teaspoon baking soda
1/4 teaspoon salt
8 tablespoons (1 stick) unsalted butter
1/2 cup pure vegetable shortening
1 3/4 cups sugar, plus more if needed
2 tablespoons ground cinnamon, plus more if needed
2 large eggs

Preheat the oven to 400 degrees, with one rack in top third and one rack in bottom third of oven. Line baking sheets with Silpat baking mats or parchment paper; set aside.
Sift together flour, cream of tartar, baking soda, and salt; set aside. In the bowl of an electric mixer fitted with a paddle attachment, combine butter, shortening, and 1 1/2 cups sugar. Beat on medium speed until light and fluffy, about 2 minutes. Scrape down sides of bowl. Add eggs, and beat to combine. Add dry ingredients, and beat to combine.
In a small bowl, combine remaining 1/4 cup sugar and the ground cinnamon. Use a small (1 1/4-ounce) ice-cream scoop to form balls of the dough, and roll in cinnamon sugar. Place about 2 inches apart on the prepared baking sheets. Bake until the cookies are set in center and begin to crack (they will not brown), about 10 minutes, rotating the baking sheets after 5 minutes. Transfer the sheets to a wire rack to cool about 5 minutes before transferring the cookies to the rack. Store in an airtight container up to 1 week.

Sunday, June 15, 2008

"SO Good" Peanut Butter Pie


While I often joke about Kraft Food & Family Magazine and their ability to work Kraft Zesty Italian Dressing into just about every recipe, they sure do come up with some mean desserts! Just recently I was blown away by their Banana Split "Cake" and tonight I made another winner from the summer 2008 issue, which they call Chocolate-Peanut Butter Candy Dessert and I am renaming "SO Good' Peanut Butter Pie, because that's all anyone could say as they were eating it. I made this for dessert for the Father's Day dinner we had tonight. It was just me, Joe, my father-in-law Fred and brother-in-law John, but between the four of us we ate all but one piece of this pie. It was just SO good. The creamy chocolate peanut butter filling is so rich and delicious that it's irresistible. I followed the recipe exactly except rather than make my own crust I purchased a chocolate crumb crust from the store. It's a perfect dessert after a warm summer day...or any day.

"SO Good" Peanut Butter Pie

12 OREO Chocolate Sandwich Cookies, crushed
2 Tbsp. butter, melted
1/2 cup peanut butter
2 cups cold milk (I used skim)
2 pkg. (4-serving size each) JELL-O Chocolate Flavor Instant Pudding & Pie Filling
2 cups thawed COOL WHIP Whipped Topping, divided
2 Tbsp. hot fudge ice cream topping
1/4 cup Reese's Pieces

MIX crushed cookies and butter; press firmly onto bottom of 8-inch square pan.
PLACE peanut butter in large bowl. Gradually add milk, stirring with wire whisk until well blended. Add dry pudding mixes. Beat 2 min. or until well blended. (Mixture will be thick.) Stir in 1 cup of the whipped topping. Spread onto prepared crust; top evenly with remaining 1 cup whipped topping.
REFRIGERATE 3 hours or until set. When ready to serve, microwave fudge topping as directed on package; drizzle over dessert. Sprinkle with candies. Store leftovers (if there are any!) in refrigerator.

Saturday, June 14, 2008

Accepting my limitations

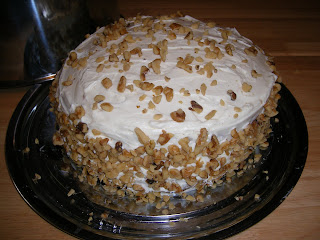
The more I bake, the more I come to learn my strengths and weaknesses. I make fantastic brownies and muffins. My cookies are usually delicious. And I have a few serious kick-ass cupcake recipes. However, making cakes from scratch is apparently not my thing. The first cake from scratch I ever attempted turned into quite the ordeal. Then there was the German chocolate cake debacle, and most recently the Mother's Day mess. From these experiences I've determined that from now on the majority of my cakes shall come from a box. I never seem to have a problem with those. The icing, however, I'll make from scratch. I seem to be pretty talented at beating together butter and sugar ;) I made this cake for a Father's Day celebration at my parent's house. I used a boxed carrot cake mix and added in golden raisins and walnuts. For the frosting, I utilized this recipe from All Recipes. I love cream cheese frosting (just ask my uncle, who makes carrot cake every Easter and often hands me an extra sidecar cup of frosting with my slice) and this one is tasty. It's not as sweet as some other cream cheese frostings but it's a nice compliment to the rich cake. And it went off without a hitch!

Cream Cheese Frosting

2 (8 ounce) packages cream cheese, softened
1/2 cup butter, softened
2 cups sifted confectioners' sugar
1 teaspoon vanilla extract

In a medium bowl, cream together the cream cheese and butter until creamy. Mix in the vanilla, then gradually stir in the confectioners' sugar. Store in the refrigerator after use.

Friday, June 13, 2008

A gooey afternoon snack

While browsing cooking blogs today, I came across these Lunch Lady Bars on Sherri's blog. Being that chocolate chip cookies are my very favorite food I felt inclined to make these. Immediately. I had a half day at work today so I thought I'd whip these up as an afternoon snack for when Joe got home from school. I'm so glad I did. These are nice and thick and soft and gooey....mmmmmm. They are also unique in the fact that they use vegetable oil instead of butter. They mixed up quickly and baked while I was finishing my cleaning. What a great reward for cleaning the house, and a perfect start to the weekend! Thank you, lunch ladies.

Lunch Lady Bars

2 1/2 cups flour
1 tsp baking soda
3/4 tsp salt
1 cup oil
1 cup brown sugar
1/2 cup granulated sugar
2 eggs
1 tsp vanilla
1 cup semi-sweet chocolate chips/chunks

Preheat oven to 350. Combine dry ingredients. Set aside. In bowl beat together oil and sugars. Beat in eggs one at a time. Add vanilla. Gradually beat in dry ingredients. Mix in 3/4 c. of chocolate chips. Spread into 9x13 pan. Sprinkle remaining 1/4 c. chips on top. Bake for 15-25 minutes or until light golden brown.

Cheeseburger and Fries Casserole

If ever there was a white trash meal, this is it. Ground beef mixed with some condensed soup and topped with frozen french fries and cheese. Don't ask what possessed me to make this or how I even came across the recipe because I truly don't know. For some reason I just wanted to make it. It was actually pretty good! Joe and I ate it with ketchup on top and enjoyed it. I don't think I'll make it again, but hey, experiments are always fun. Oh, and to complete the white trash theme of the evening, Joe ate this meal wearing just a white t-shirt and his boxers. Hey, we're classy around here, what can I say? The original recipe is from All Recipes, but I made a few changes and made a smaller portion.

Cheeseburger and Fries Casserole

1 pound lean ground beef
salt and pepper to taste
garlic powder to taste
burger seasoning to taste
a few shakes of Worchestire sauce
1/2 (10.75 ounce) can condensed cheddar cheese soup
3/4 (10.75 ounce) can condensed cream of mushroom soup
1/2 (16 ounce) package frozen French fries
1 cup shredded Cheddar cheese

Preheat the oven to 375 degrees F (190 degrees C).
Bake french fries on baking sheet for 10 minutes while preparing beef.
In a skillet over medium-high heat, brown the beef. Cook, stirring occasionally until beef is no longer pink. Drain off excess grease, and add seasonings and Worchestire sauce.
Return to the heat, and stir in the mushroom and cheese soups until well blended. Heat through, and remove from stove. Transfer the mixture to a 8x8 inch baking dish. Cover the ground beef mixture with a layer of partially cooked French fries.
Bake for 25 to 30 minutes in the preheated oven. When the fries are golden brown, remove the casserole from the oven, and sprinkle cheese over the top. Return to the oven, and bake just until cheese has melted.

Sunday, June 8, 2008

Something's Fishy!

My sister is throwing her boyfriend a surprise 30th birthday party today and asked me to make a cake. But not just any cake - a fish-shaped cake since her boyfriend loves to fish. I requested that she find me a cake pan in the shape of a fish, but instead she produced a photo of a cake from a magazine and asked me to recreate it. It was actually quite simple and I love the way it turned out. I just used a box mix and canned frosting. Mr. Fish is simply a 9-inch round single layer cake frosted with icing I tinted green and deocrated with candy orange slices and gumdrops. Since I had extra batter after making the cake I also made a bunch of mini cupcakes to serve as bubbles and topped them with a bunch of "Aqua Life" Swedish fish candies. Happy Birthday Aaron!

Very Berry Muffins

It occurred to me not long ago as I was browsing other cooking blogs that lots of women make nice breakfasts for themselves and their husbands on weekends. I for one never make breakfast. Ever. I'm usually at the gym on weekend mornings, and I prefer to eat lightly during the day, so breakfast has never been my meal. This Sunday however I decided to take the day off from the gym and seize the opportunity to make breakfast. It is SO hot here this weekend that I knew I wouldn't be making anything big or heavy so when I saw these muffins on Noodle Nights and Muffin Mornings I knew they would be perfect. All I changed was the name - my bag of frozen berries had blueberries, blackberries, raspberries and strawberries. That makes four berries, so I'm titling them simply "Very Berry Muffins." I discovered that strawberries do not mash well, so I ended up chopping them into little pieces. These muffins were delicious. Nice and sweet and perfect warm with a dab of butter. My only complaint was seeds - the seeds from the berries got stuck in my teeth. But that didn't make me stop eating them, and DH had no complaints at all - he had three. I'm deeming my foray into the breakfast world a success.

I should also mention that this will forever be known as the recipe that blew the microwave. When I turned on the microwave to melt the butter I was met with sparks and crackles and almost-fire. So long, microwave. Not sure what happened (and I know is wasn't the fault of the muffins) but Joe is out buying a new one as I type.

Very Berry Muffins

4 tbsp butter (melted and cooled)
1 cup flour
1 tsp cinnamon
1 tsp baking powder
1/4 tsp salt
1/2 cup sugar(plus additional for sprinkling)
1 egg
1/4 cup milk
1 1/2 cup frozen mixed berries (thawed and divided)

Preheat oven to 375 degrees and spray muffin tin with cooking spray.
Combine flour, cinnamon, baking powder and salt; set aside. In a small bowl combine 1/2 cup berries and milk and mash well. In a medium bowl, cream butter and sugar; add egg and beat well. Gradually mix in dry ingredients by hand. Mix in berry/milk mixture, followed by remaining berries and mix until just combined.
Using two spoons pour batter into prepared muffin tin, filling each chamber 3/4 full. Sprinkle top of muffins with sugar. Bake for 22-28 minutes or until a toothpick inserted in center comes out clean.
I got nine standard size muffins.

Thursday, June 5, 2008

Mexican Lasagna

While I'm not a huge fan of Mexican food, I do like tacos that I can make at home where I control the ingredients and the heat (spicy is not my thing). Joe and I usually have tacos at least once a month, and I often try to mix it up and try the components of tacos in various ways. I basically just winged this "Mexican lasagna" last night and it came out very tasty. I kept it healthy and used all low-fat/low-calorie ingredients (except for the cheese - Joe and I have learned that there's nothing like real, full-fat cheese), which was good since I had found myself unable to stop eating it. I was still nibbling it out of the pan as I was cleaning up. Measurements below are estimated - I just sort of tossed things together by sight. You really can't mess this up, and you can add pretty much anything you like. Next time I'll probably top it with a dollop of sour cream.

Mexican Lasagna

1 lb. extra-lean ground beef
1 packet taco seasoning
1 can black beans, rinsed and drained
1 cup frozen corn
3 low-fat Flatout wraps
1 jar salsa
1 cup cheddar cheese, shredded

Preheat oven to 350. Brown ground beef over medium heat until cooked through. Drain fat and add taco seasoning, finish cooking meat according to seasoning packet instructions. Stir in corn and black beans, heat through. Spray a small square baking dish with cooking spray. Tear Flatout wraps into strips and layer on bottom of baking dish. Top wraps with a layer of the meat mixture, half the jar of salsa and half the cheese. Repeat layers once, ending with cheese. Bake 30 minutes or until cooked through and bubbly.